FREE SHIPPING
from Boise, ID
from Boise, ID


Adding a roof to your free-standing or attached pergola is quite easy and should take you no more than 1-2 hours. You won't need any speciality tools, either... just a tape measure, level, drill, ladder and chop saw (aka table saw or miter saw).
Our roof kits include all the brackets and hardware you'll need to assemble the roof. You'll just need to purchase your 2x6, 2x4, 6x6 or 4x4 wood locally from a building supply or home improvement store.
You'll need the following simple tools to assemble your Zen pergola:


Choose from the following roof styles to jump directly to the instructions for that roof type:
PLEASE NOTE: It is much easier to assemble the entire roof (including all roof rafters) when the pergola roof is still on the ground - i.e. before you install the vertical posts. However, doing so makes the roof much heavier. If you do not have adequate help to safely raise the completed roof (including rafters), it is advisable to wait to install the roof rafters until after the pergola frame is fully assembled and raised into place.

Identify the beam (post) to which you will be attaching the roof rafters. Measure the distance from the inner edge of the vertical arm of the bracket on the left side of the beam to the inner edge of the vertical arm of the bracket on the right side of the beam.
For example purposes only, we will assume the distance is 12' 0.0".
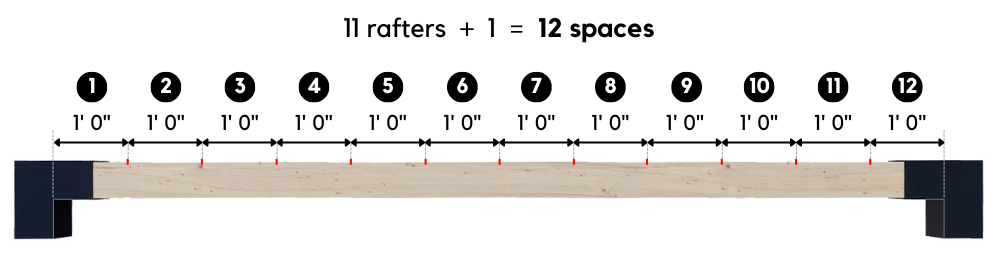
Divide the distance you measured in step 1 by the number of roof rafters that will attach to this beam plus 1. For example, if there will be 11 rafters attaching to the beam, you would divide by 12 (i.e. 11 rafters + 1).
Starting at the inner edge of the vertical arm of the left bracket, use a pen/pencil to make marks on the beam (post) at the calculated interval. (In this example, you'd make a mark every 1' 0.0".) If your calculations are correct, the number of marks you make on the beam will equal the number of rafters you'll be attaching to the beam.
These marks represent the center point for each rafter.

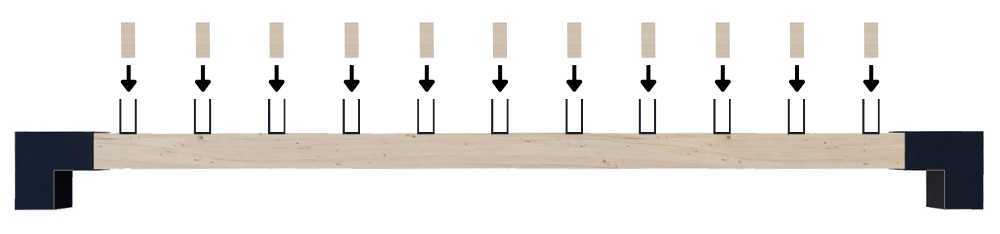
Use 2 stainless steel screws (included) to install an insert bracket (either a 2x6" insert bracket or 2x4" insert bracket) at each spot where you marked the beam in step 2 above. Remember that the marks indicate the center point of each bracket. The open end of each insert bracket should be facing up so you can slide the 2x6 or 2x4 slats in from above.
Before moving on to step 4, complete steps 1-3 again on the beam opposite the beam you've been working on (which is the other beam to which you will be attaching the roof rafters).

Slide the rafter slats (either 2x6 or 2x4 wood slats) in from above. Then secure the slats to the insert brackets using the screws provided (2 per insert bracket).
The roof is now completed.
PLEASE NOTE: It is much easier to assemble the entire roof (including all roof rafters) when the pergola roof is still on the ground - i.e. before you install the vertical posts. However, doing so makes the roof much heavier. If you do not have adequate help to safely raise the completed roof (including rafters), it is advisable to wait to install the roof rafters until after the pergola frame is fully assembled and raised into place.
Identify the beam (post) to which you will be attaching the roof rafters. Measure the distance from the inner edge of the vertical arm of the bracket on the left side of the beam to the inner edge of the vertical arm of the bracket on the right side of the beam.
For example purposes only, we will assume the distance is 12' 0.0".
Divide the distance you measured in step 1 by the number of roof rafters that will attach to this beam plus 1. For example, if there will be 11 rafters attaching to the beam, you would divide by 12 (i.e. 11 rafters + 1).
Starting at the inner edge of the vertical arm of the left bracket, use a pen/pencil to make marks on the beam (post) at the calculated interval. (In this example, you'd make a mark every 1' 0.0".) If your calculations are correct, the number of marks you make on the beam will equal the number of rafters you'll be attaching to the beam.
These marks represent the center point for each rafter.

Use 2 stainless steel screws (included) to install a rafter bracket (either a 2x6" rafter bracket or 2x4" rafter bracket) at each spot where you marked the beam in step 2 above. Remember that the marks indicate the center point of each bracket. The open end of each rafter bracket should be facing up so you can slide the 2x6 or 2x4 slats in from above.
Before moving on to step 4, complete steps 1-3 again on the beam opposite the beam you've been working on (which is the other beam to which you will be attaching the roof rafters).
Slide the rafter slats (either 2x6 or 2x4 wood slats) in from above. Then secure the slats to the rafter brackets using the screws provided (4 per rafter bracket).
The roof is now completed.
PLEASE NOTE: It is much easier to assemble the entire roof (including all roof rafters) when the pergola roof is still on the ground - i.e. before you install the vertical posts. However, doing so makes the roof much heavier. If you do not have adequate help to safely raise the completed roof (including rafters), it is advisable to wait to install the roof rafters until after the pergola frame is fully assembled and raised into place.
Identify the beam (post) to which you will be attaching the roof rafters. Measure the distance from the inner edge of the vertical arm of the bracket on the left side of the beam to the inner edge of the vertical arm of the bracket on the right side of the beam.
For example purposes only, we will assume the distance is 12' 0.0".
Divide the distance you measured in step 1 by the number of roof rafters that will attach to this beam plus 1. For example, if there will be 11 rafters attaching to the beam, you would divide by 12 (i.e. 11 rafters + 1).
Starting at the inner edge of the vertical arm of the left bracket, use a pen/pencil to make marks on the beam (post) at the calculated interval. (In this example, you'd make a mark every 1' 0.0".) If your calculations are correct, the number of marks you make on the beam will equal the number of rafters you'll be attaching to the beam.
These marks represent the center point for each rafter.

Use 2 stainless steel screws (included) to install an insert bracket (either a 2x6" insert bracket or 2x4" insert bracket) at each spot where you marked the beam in step 2 above (remember that the marks indicate the center point of each bracket). You'll typically want to rotate the brackets so the slats are perpendicular to the sun rays of the evening sun (coming the left in this image). Use a level to orient all of the brackets at the same angle (typically 45 degrees but other angles are fine as well). The open end of each insert bracket should be facing upward so you can slide the 2x6 or 2x4 slats in from above.
Before moving on to step 4, complete steps 1-3 again on the beam opposite the beam you've been working on (which is the other beam to which you will be attaching the roof rafters).

Slide the roof slats (either 2x6 or 2x4 wood slats) in from above. Then secure the slats to the insert brackets using the screws provided (2 per insert bracket).
The roof is now completed.
PLEASE NOTE: It is much easier to assemble the entire roof (including all roof rafters) when the pergola roof is still on the ground - i.e. before you install the vertical posts. However, doing so makes the roof much heavier. If you do not have adequate help to safely raise the completed roof (including rafters), it is advisable to wait to install the roof rafters until after the pergola frame is fully assembled and raised into place.
Identify the beam (post) to which you will be attaching the roof rafters. Measure the distance from the inner edge of the vertical arm of the bracket on the left side of the beam to the inner edge of the vertical arm of the bracket on the right side of the beam.
For example purposes only, we will assume the distance is 12' 0.0".
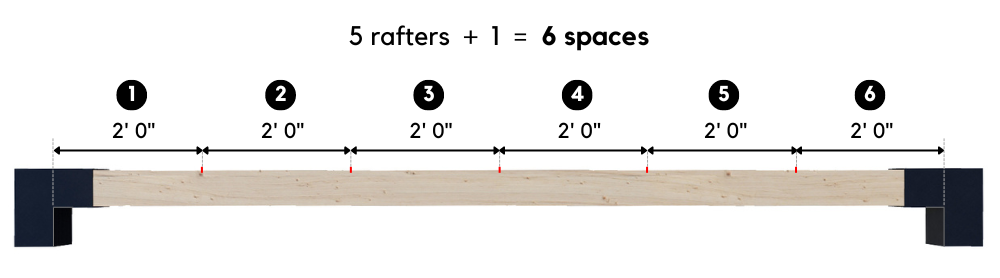
Divide the distance you measured in step 1 by the number of roof rafters that will attach to this beam plus 1. For example, if there will be 5 rafters attaching to the beam, you would divide by 6 (i.e. 5 rafters + 1).
Starting at the inner edge of the vertical arm of the left bracket, use a pen/pencil to make marks on the beam (post) at the calculated interval. (In this example, you'd make a mark every 2' 0.0".) If your calculations are correct, the number of marks you make on the beam will equal the number of rafters you'll be attaching to the beam.
These marks represent the center point for each rafter.

Use 4 stainless steel screws (included) to install an insert bracket (either a 6x6" insert bracket or 4x4" insert bracket) at each spot where you marked the beam in step 2 above. Remember that the marks indicate the center point of each bracket. The open end of each insert bracket should be facing up so you can slide the 6x6 or 4x4 posts in from above.
Before moving on to step 4, complete steps 1-3 again on the beam opposite the beam you've been working on (which is the other beam to which you will be attaching the roof rafters).
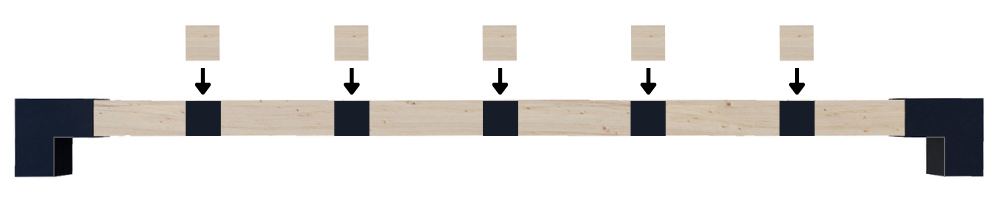
Slide the rafter posts (either 6x6 or 4x4 wood slats) in from above. Then secure the slats to the insert brackets using the screws provided (4 per insert bracket).
The roof is now completed.


