


Overview
This is an all-inclusive guide for building your own free-standing 12x10 wood pergola. It includes:
- A list of the materials you'll need to buy
- A list of the tools you'll need for assembly
- Step-by-step instructions for building the pergola
Before going any further, let's make sure you're on the correct design page for the type/style/dimensions of pergola you want to build (and get you to the right page if you're not).
The Finished Product
These pergola plans are for building a pergola with the following characteristics:
-
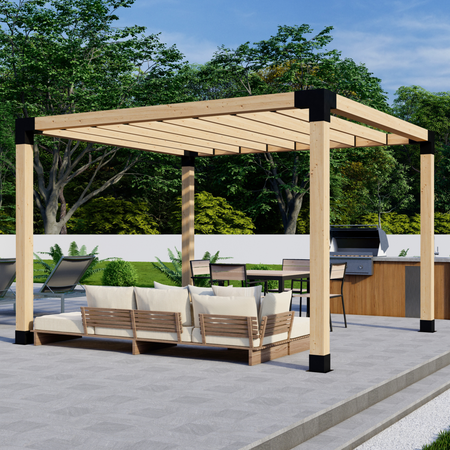 TYPE: Free-standing (see these wall-mount pergola plans instead)
 - COMPOSITION: Wood frame/slats with steel connector brackets
- WOOD SIZE FOR FRAME: Your choice of 4x4 lumber (which actually measures 3.5 inches x 3.5 inches) or 6x6 lumber (which is actually 5.5 inches x 5.5 inches)
- ROOF & WALLS: Optional (this page provides instructions for building the pergola's outer frame and provides links to detailed instructions for adding your choice of several styles of roof slats/rafters/canopies and also one or more privacy walls)
- HEIGHT: 8 feet (if you want the pergola to be 10 feet tall instead of the standard 8 feet, simply replace 4 of the 8-ft-length posts with 10-ft-length posts in the materials list below)
- DIMENSIONS: 12' wide x 10' deep with roof slats (if desired) running the 12' width and therefore providing maximum shade when sunlight comes from the 12' width side (see these 10x12 pergola plans instead if you want your pergola oriented so sunlight comes from the 10' side)
Please note that the term "dimensions" is a bit ambiguous, as it could be interpreted to mean:
- The overall dimensions of the pergola (outside edge to outside edge), or
- The dimensions of the pergola's roof opening (inside edge to inside edge)
These plans are written to accommodate both meanings. You'll just need to be careful to follow the correct set of measurements when trimming your wood (see step 1 in the building instructions below).
Materials You'll Need to Buy
Purchase either this 4x4 pergola bracket kit (if you want the pergola posts and beams to be made of 4x4s, which actually measure 3.5" x 3.5") OR this 6x6 pergola bracket kit (if you'd rather use 6x6s, which actually measure 5.5" x 5.5"). Both kits include all of the following:
- 4x post base brackets
- 4x corner 3-arm brackets
- All of the screws you'll need (stainless steel)
- Depending on which roof option you select, the kit may also include roof brackets or a shade canopy
Additionally, you'll need to purchase the following items locally from a building supply warehouse or home improvement store (i.e. Lowe's, Home Depot, etc.):
-
4x 8-ft-long posts (your choice of 4x4s or 6x6s)
- 2x 10-ft-long posts (same post size as above)
- 2x 12-ft-long posts (same post size as above)
- 16x ground fasteners
While the exact cost will vary depending on your location, the type of wood you choose, local stores & availability, we estimate that the total cost for the above lumber and ground fasteners will be about $259 (if you opt for 4x4 posts) or about $496 (if you get 6x6 posts). If you're unsure what type of wood to use and/or what type of anchoring hardware to buy, take a couple minutes to see our recommendations.
Please note that the materials list above only shows the lumber needed for the outer frame of the pergola (i.e. the 4 vertical posts and the roof beams). If you plan to add a slatted roof and/or one or more privacy walls (see these wall kits for 4x4-frame pergolas or these wall kits for 6x6-frame pergolas), you'll need to purchase additional lumber (likely either 2x4s or 2x6s).
Tools You'll Need for Assembly
You'll only need the following basic tools to build your pergola:
- Power drill
- Chop saw (aka circular saw / miter saw)
- Ladder
- Tape measure
- Level
If you don't have one or more of these tools, you can probably borrow them from a friend or neighbor (or rent them for a few hours from a local home improvement store).
Step-by-Step Building Instructions
Once you've received your Zen Pergolas bracket kit and purchased the necessary wood & ground fasteners from a local store, you're ready to build your 12x10 wood pergola. The entire process should take no more than 2 hours. Let's get to it!
Step 1. Trim the Posts for the Roof Beams (if required)
This first step isn't difficult, but you need to pay close attention to which of the 4 sets of measurements you need to use. Don't hesitate to contact us if you have any questions.
The required length for each of the roof beams depends on two things:
- Whether you want the overall outside dimensions of the pergola to be 12' x 10' OR the inside dimensions of the roof opening to be 12' x 10' (please note that if you're adding a 12x10 shade canopy to your pergola, you must make the inside dimensions of the roof opening exactly 12' x 10' and must therefore use measurement set #3 or #4); and
- Whether you're building the pergola frame with 4x4 posts (which are actually 3.5" x 3.5") or 6x6 posts (which are actually 5.5" x 5.5").
Make sure to use the correct set of measurements, paying close attention to the set title in the top-left corner of each of the following 4 tables...
| SET #1 - 12' x 10' Outside Dimensions - 4x4 Wood Posts | # of Posts | Beginning Length | Amount to Trim | Length After Trimming |
| Posts for the 12' width roof beams | 2 | 144 inches (12 feet) | 7 and 5/16 inches | 136 and 11/16 inches |
| Posts for the 10' depth roof beams | 2 | 120 inches (10 feet) | 7 and 5/16 inches | 112 and 11/16 inches |
Using these measurements from SET #1, your pergola's outside dimensions will be exactly 12' wide x 10' deep and the roof opening will be approximately 11' 4.7" wide x 9' 4.7" deep.
| SET #2 - 12' x 10' Outside Dimensions - 6x6 Wood Posts | # of Posts | Beginning Length | Amount to Trim | Length After Trimming |
| Posts for the 12' width roof beams | 2 | 144 inches (12 feet) | 11 and 5/16 inches | 132 and 11/16 inches |
| Posts for the 10' depth roof beams | 2 | 120 inches (10 feet) | 11 and 5/16 inches | 108 and 11/16 inches |
Using these measurements from SET #2, your pergola's outside dimensions will be exactly 12' wide x 10' deep and the roof opening will be approximately 11' 0.7" wide x 9' 0.7" deep.
| SET #3 - 12' x 10' Roof Opening Dimensions - 4x4 Wood Posts | # of Posts | Beginning Length | Amount to Trim | Length After Trimming |
| Posts for the 12' width roof beams | 2 | 144 inches (12 feet) | 0 inches (do not trim) | 144 inches |
| Posts for the 10' depth roof beams | 2 | 120 inches (10 feet) | 0 inches (do not trim) | 120 inches |
Using these measurements from SET #3, your pergola's outside dimensions will be approximately 12' 7.3" wide x 10' 7.3" deep and the roof opening will be exactly 12' x 10'.
| SET #4 - 12' x 10' Roof Opening Dimensions - 6x6 Wood Posts | # of Posts | Beginning Length | Amount to Trim | Length After Trimming |
| Posts for the 12' width roof beams | 2 | 144 inches (12 feet) | 0 inches (do not trim) | 144 inches |
| Posts for the 10' depth roof beams | 2 | 120 inches (10 feet) | 0 inches (do not trim) | 120 inches |
Using these measurements from SET #4, your pergola's outside dimensions will be approximately 12' 11.3" wide x 10' 11.3" deep and the roof opening will be exactly 12' x 10'.
Note: These pergola plans assume that your pergola will be 8 feet tall and that you purchased 8' posts to use as the 4 vertical posts, in which case there's no need to trim them. If you'd like the roof to be 10' tall (rather than 8' tall), you should have purchased four 10' posts (in place of four 8' posts) to serve as the vertical posts. If you'd like your pergola to be taller than 8' but shorter than 10', go ahead and trim the four 10' posts down to the exact height you want the pergola to be. We don't recommend using any longer than 10' posts.
Reminder: If you're adding a 12x10 shade canopy to your pergola, you must use measurement set #3 or #4 above so the inner dimensions of the roof opening are exactly 12' x 10'.
Moving forward: To keep things as simple and concise as possible, even though you may have trimmed a few inches off the roof beams, the remainder of these instructions will still refer to the width-side roof beams as 12' beams and will refer to the depth-side roof beams as 10' beams.
Step 2. Assemble the Roof Structure
You'll want to assemble the roof structure first while it's still on the ground and won't require you to be on a ladder.
Step 2a

Lay out the two 12' roof beams. Set a corner 3-arm bracket next to both ends of the two beams. Make sure that the bracket arm (channel) with only 2 holes on each side is facing down and touching the ground.
Step 2b

Slide the four brackets onto the ends of the beams until the "lip" inside the brackets butts up against the ends of the beam. Secure the post to the brackets using the stainless steel screws included with the bracket kit.
On the bracket faces with only 2 holes (which should be facing down towards the ground), put a screw in both holes.
On the bracket faces with 4 holes, you only need to place a hole in the two outermost holes (closest to the visible wood). That said, the kit includes enough screws to fill all 4 holes if you'd like to do so. However, if you will be adding a shade canopy to the roof, you should not put a screw in the top-most / inner-most hole on the horizontal arms (channels) since this is the hole you'll be using to secure the corner accessory mounts for mounting the canopy (which you'll do in a later step).
Step 2c

Move the two beams 11-12 feet apart, and lay out the two 10' depth-side beams perpendicular to them (on either end next to the steel brackets). Slide the 10' beams into the brackets attached to one of the 12' beams until the beams butt up against the "lips" inside the bracket. Then use screws to secure the brackets to the beams (filling the same holes as you did in step 2b above).
Step 2d

Slide the brackets attached to the other 12' beam onto the other ends of the 10' beams, and secure the brackets to the beams using the screws (filling the same holes in the brackets).
You have now completed the outside frame of the roof. If you will be adding roof slats or a shade canopy to the roof, you will want to do that before proceeding to step 3. Here are links to instructions for several different roof styles/options:
- How to add straight inline 2x4 or 2x6 roof slats
- How to add angled inline 2x4 or 2x6 roof slats
- How to add traditional 2x4 or 2x6 rafters atop the roof beams
- How to add inline 4x4 or 6x6 square posts
- How to add a shade canopy
After you have added your preferred roof, proceed to step 3.
Step 3. Assemble the Vertical Posts
Lay out the 4 posts that will serve as the pergola's vertical posts on the ground. Set a steel post base bracket next to each one. One by one, slide the bracket onto one end of the post base bracket and secure the bracket to the post using the screws provided in the kit. Fill both holes on each bracket face.
Once you've secured a post base bracket onto one end of all of the posts, go ahead and proceed to step 4.
Step 4. Connect the Vertical Posts to the Roof
Step 4a

With the assistance of a couple/few helpers, raise one side of the roof assembly and slide a vertical post into each of the 3-arm brackets on the raised side. The vertical posts should go all the way to the top of the brackets. Secure the posts to the 3-arm brackets using the screws included in the kit (filling both holes on each face).
Step 4b

With the assistance of a couple/few helpers, raise the other side of the roof assembly and slide the remaining vertical posts into the other 3-arm brackets. Again, secure the posts to the brackets using the screws in the kit.
The pergola frame is now complete and is ready to anchor to the ground (which you'll do in the next step).
 Step 5. Secure the Post Bases to the Ground
With the assistance of a couple/few helpers, move the pergola into the position. Secure each post base bracket to a solid base (i.e. cement slab, concrete footing, etc.) using 4 ground fasteners per base bracket. With virtually any type of fastener, you'll want to drill a hole into the cement/concrete before securing the anchoring hardware.
Step 6. Add Privacy Wall(s) and/or Corner Supports - if desired
If you purchased a privacy wall kit for one or more of the sides of the pergola, follow these step-by-step instructions to install it/them.
If you purchased corner support brackets for the top corners of the pergola, follow these detailed instructions to add the corner supports.
DISCLAIMER: While we've made every effort to make these instructions and calculations complete and accurate, please be advised that you use them at your own risk. We recommend double-checking all of the calculations on this page before building your pergola.