FREE SHIPPING
from Boise, ID
from Boise, ID


Assembling a Zen pergola is fun and easy, even for novices with little or no building experience. You and a helper (or two) can easily have it assembled in 2-3 hours (longer if your pergola includes roof rafters and/or a privacy wall). You won't need any speciality tools, either... just a drill, tape measure, level, ladder and chop saw (aka table saw or miter saw).
Zen pergola kits include everything you'll need to assemble your own backyard pergola except the following (which you'll need to purchase locally from a building supply or home improvement store):
1. Wood (lumber)
2. Anchoring hardware
ZenPergolas.com warrants all products to be free of any defects in material or workmanship upon arrival of such products. ZenPergolas.com further warrants all products to be effective and adequate when used in accordance with design limits and when installed and maintained properly for a period of five (5) years after receiving such products.
When damage or defects are brought to the attention of ZenPergolas.com, ZenPergolas.com may choose, at their sole discretion, to repair damaged or defected parts OR to send out an entire replacement part at zero cost to the customer. ZenPergolas.com is not responsible for time or costs involved to install replacement parts.
All warranty obligations of ZenPergolas.com shall be limited to five (5) years against manufacturing defects. Any such remedies that are made shall constitute ZenPergolas.com's sole obligation and sole remedy of purchaser under this warranty. In no event will ZenPergolas.com be held responsible for incidental, consequential, or special loss or damage, however caused.
You'll need the following simple tools to assemble your Zen pergola:


Lay out a 6x6 post (5.5" x 5.5" actual size) in between two 4-arm post brackets (vertical arm with less holes facing down).

Slide the 4-arm brackets onto the ends of the post such that each end of the post is fills the arm (channel) but will not interfere with the vertical post (which will go all the way to the top of the bracket). Secure the post with the provided screws (see screw diagram below).

As shown in this image, set a 3-arm bracket (vertical arm with less holes facing down) next to the left end a post.

Slide the left end of the post into the 3-arm bracket until the post fills the entire arm (channel) but not so far that it will interfere with the vertical post (which will go all the way to the top of the bracket). Secure the post to the bracket with the provided screws.

As shown in this image, set a 3-arm bracket (vertical arm with less holes facing down) next to the right end a post.

Slide the right end of the post into the 3-arm bracket until the post fills the entire arm (channel) but not so far that it will interfere with the vertical post (which will go all the way to the top of the bracket). Secure the post to the bracket with the provided screws.

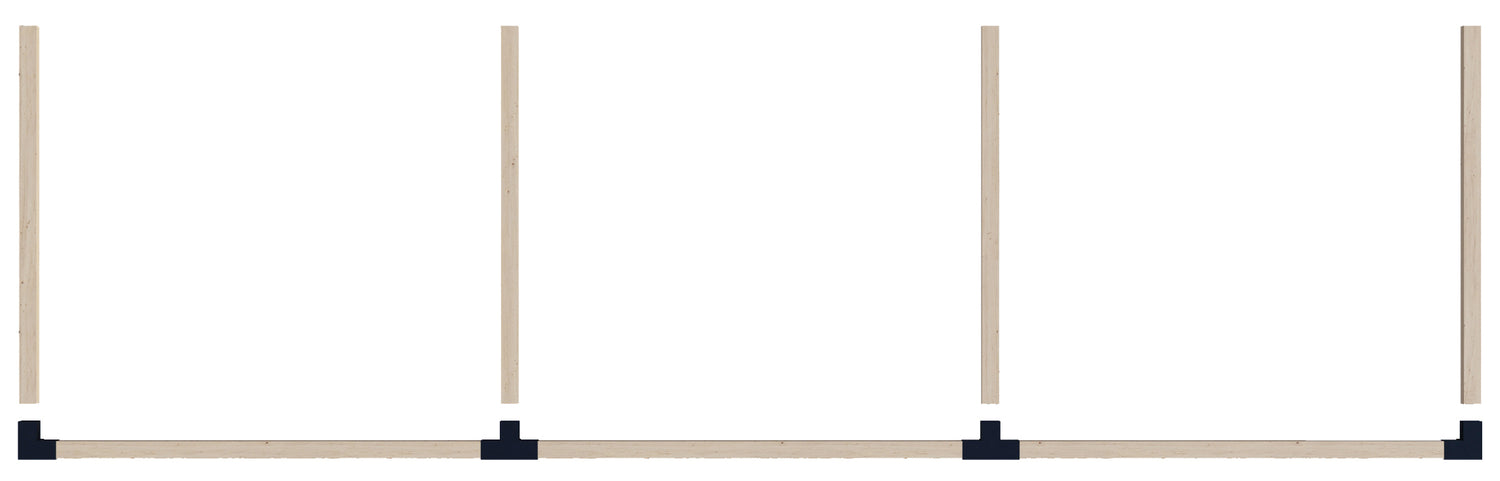
Lay out the three post/bracket structures you completed in steps 1B, 1D and 1E as shown in this image, with the two 4-arm brackets in the middle.

Slide the two end posts (with the 3-arm brackets on the end of them) into the 4-arm brackets until the posts fill the entire arm (channel) but will not interfere with the vertical post (which will go all the way to the top of the bracket). Secure the posts to the 4-arm brackets using the provided screws.
Lay out 4 more posts next to the open arms (channels) of the structure you just completed in step 1H above, as shown in this image.
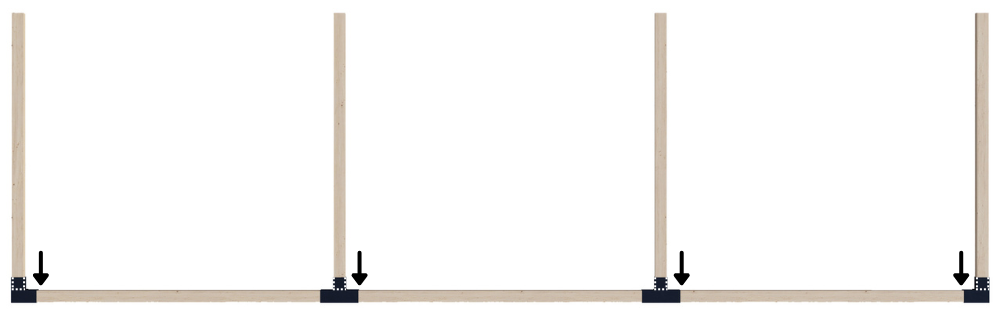
Slide the posts into the 3-arm brackets and 4-arm brackets until the post fills the entire arm (channel) but not so far that it will interfere with the vertical posts (which will go all the way to the top of the brackets). Secure the posts to the brackets with the provided screws.
You have now completed the roof assembly.
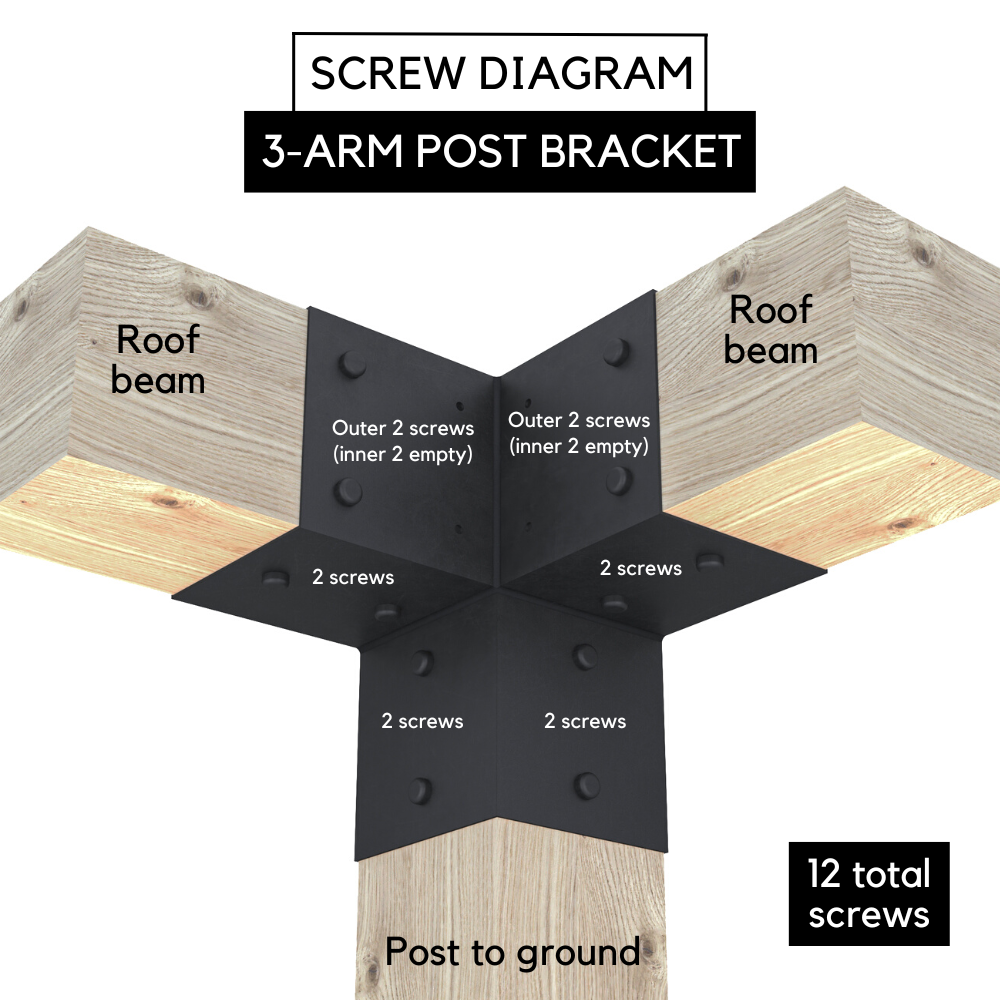
The 3-arm post bracket should be oriented such that the arm (channel) with only 2 screw holes per side is at the bottom (for the vertical post going to the ground).
Each 3-arm post bracket in your kit includes 12 stainless steel screws. See the screw diagram to the right to see which 12 holes the screws should go in. (Additional holes are for attaching accessories.)
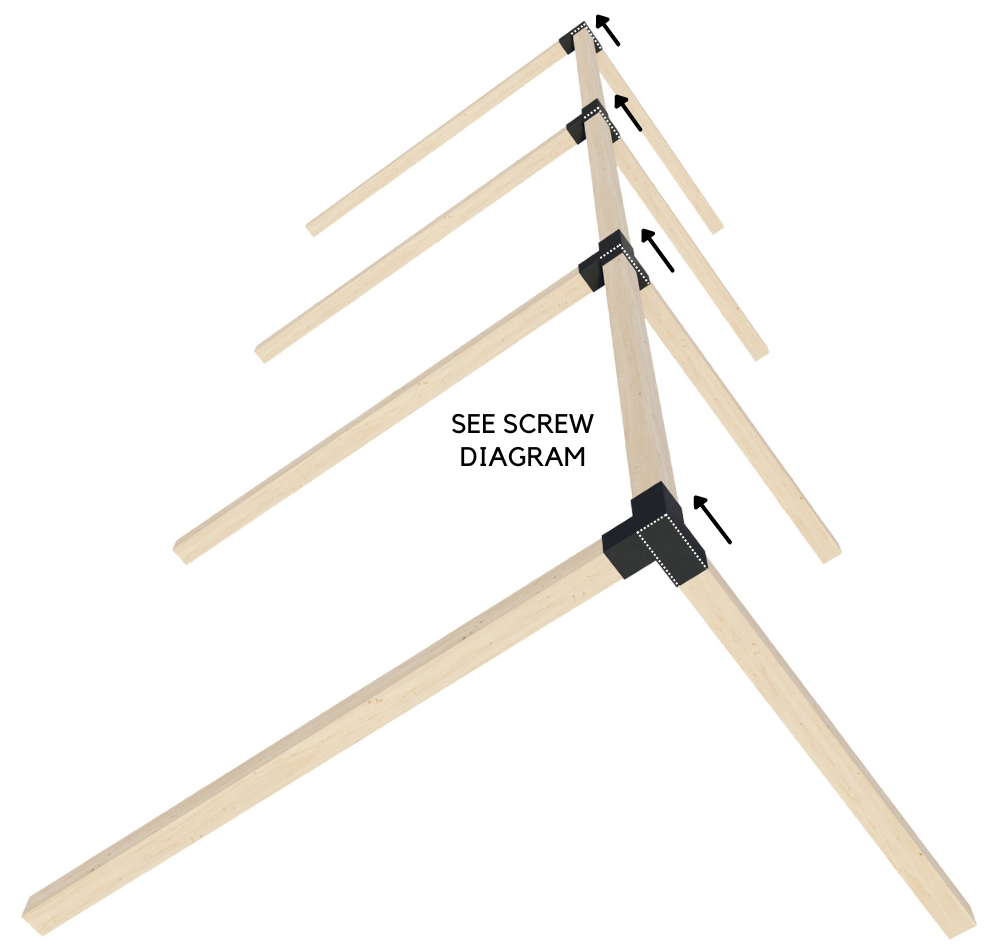
With the assistance of 2 or 3 helpers, lift the side of the roof assembly that has all of the brackets. Slide a 6x6 post into all four of these brackets until they hit the top of the brackets. Secure the posts to the brackets using the provided screws (see screw diagram above).
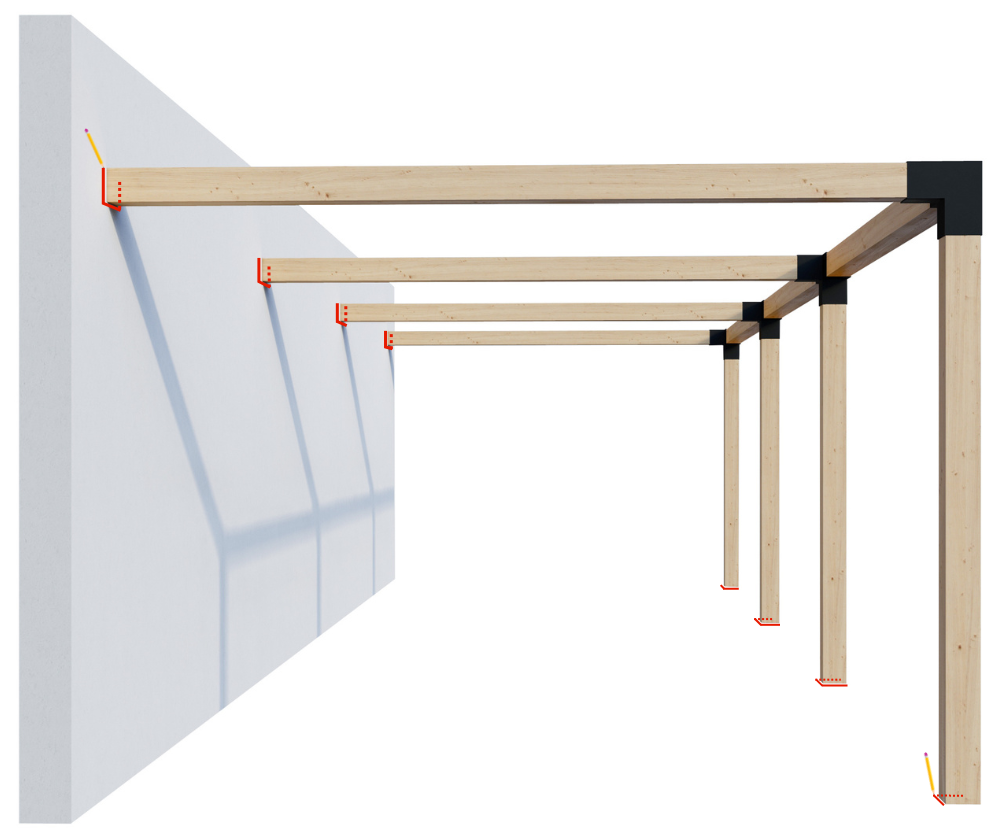
With the assistance of 2 or 3 helpers (and using ladders as necessary), lift the four roof beams and set the pergola frame against the wall to which you'll be attaching the beams. Use a level to ensure that the roof is level and the posts are perfectly vertical.
Now use a pen or pencil to lightly trace:
i) the inside edges of the vertical posts (on the ground); and
ii) the left, bottom and right edges of the horizontal beams where they touch the wall to which you will be attaching the pergola.
Move the roof assembly a few feet out of the way. Set a 6x6 base bracket in each of the 4 spots you marked. Attach the base brackets to the ground using appropriate anchoring hardware (not included).
The type of anchoring hardware you'll want to use depends on what type of secure base (foundation) you're attaching the base brackets to (i.e. concrete footing, cement pad, deck footings, etc.). Ask a professional at a building supply or home improvement store what type of anchoring hardware they recommend.
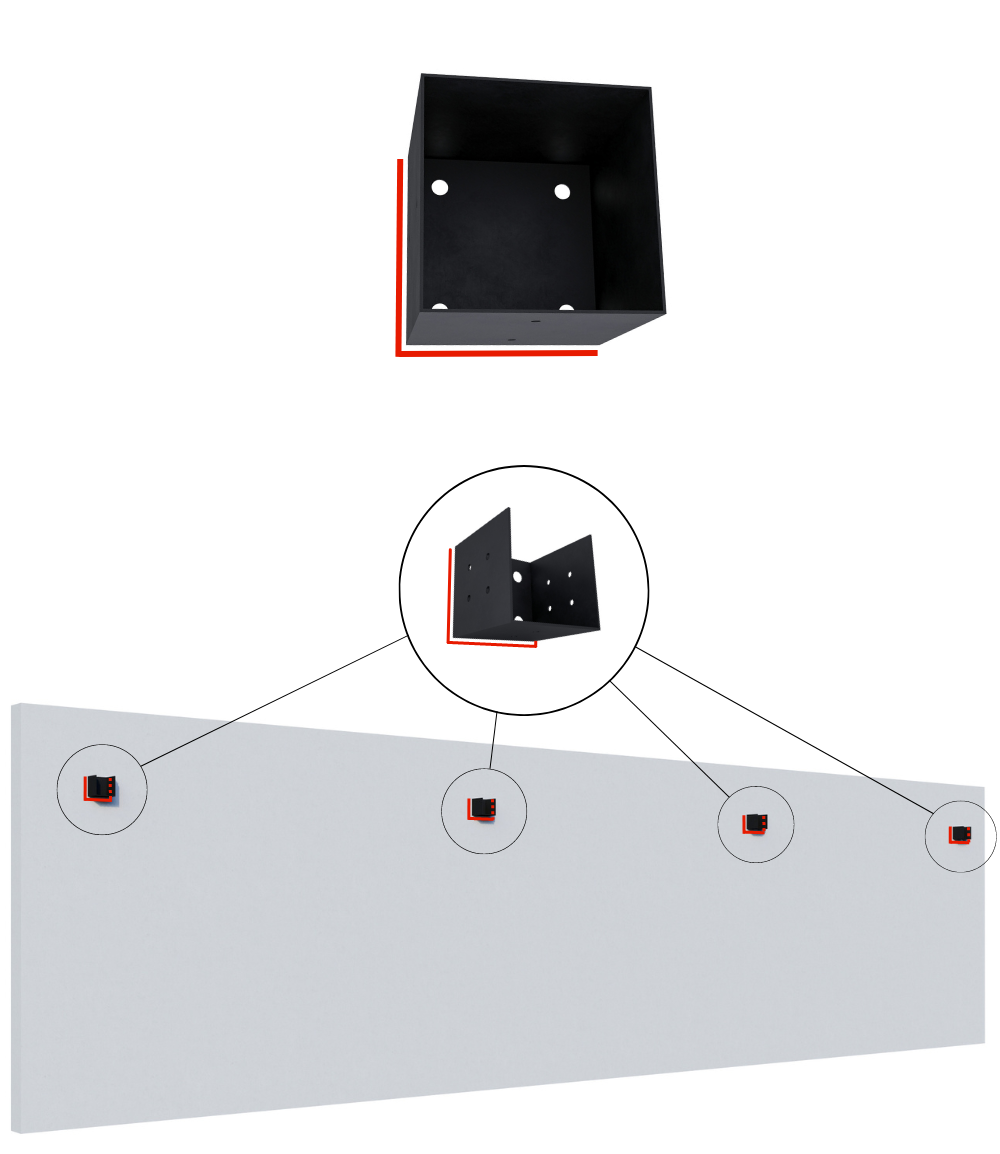
On the wall to which you'll be attaching the pergola beams, line up the four 6x6 wall mount brackets with the marks you made in Step 3A (making sure to account for the thickness of the brackets). Attach the four wall mount brackets to the wall using appropriate anchoring hardware (not included).
The type of anchoring hardware you'll want to use depends on what type of secure base you're attaching the wall mount brackets to. Ask a professional at a building supply or home improvement store what type of anchoring hardware they recommend.

Put a person on each corner of the pergola frame, as well as a person or two in the middle. Simultaneously slide the 4 vertical posts into the base brackets as you also slide the 4 horizontal roof beams into the wall mount brackets (from above).
Then secure the 6x6" posts to the 4 base brackets and 4 wall mount brackets using the provided screws. The pergola frame is now complete.
If your pergola kit includes a roof kit, a privacy wall kit, a corner support kit and/or a side railing kit, click the appropriate link(s) below for step-by-step installation instructions:


